Best gaming PC build guide for a $1,000 budget you can buy. I’m going to be going over building a budget gaming computer with only a $1000 to work with. When I build a system I find components that give the best performance for the money to fit in the budget.
I built this PC for a friend of mine. He has decided to move away from console gaming and joining the PC master race. His budget was $1000 and he wants to primarily play the latest games on it. I told him $1000 should be more enough to build a respectable gaming computer.
With the Oculus Rift and [easyazon_link identifier=”B00VF5NT4I” locale=”US” nw=”y” nf=”y” tag=”computersys05-20″]HTC VIVE[/easyazon_link] being released earlier this year, he wanted it to be able to handle Virtual Reality (VR) headsets at a later date so I made sure this system will be able to do as good as possible given the budget at hand.
The goals for this gaming build are to be very capable gaming PC for the money. Be able to play games at high quality setting at 1080p, medium to high settings at 1440p and low to medium at 4k. This build will be VR capable.
CASE
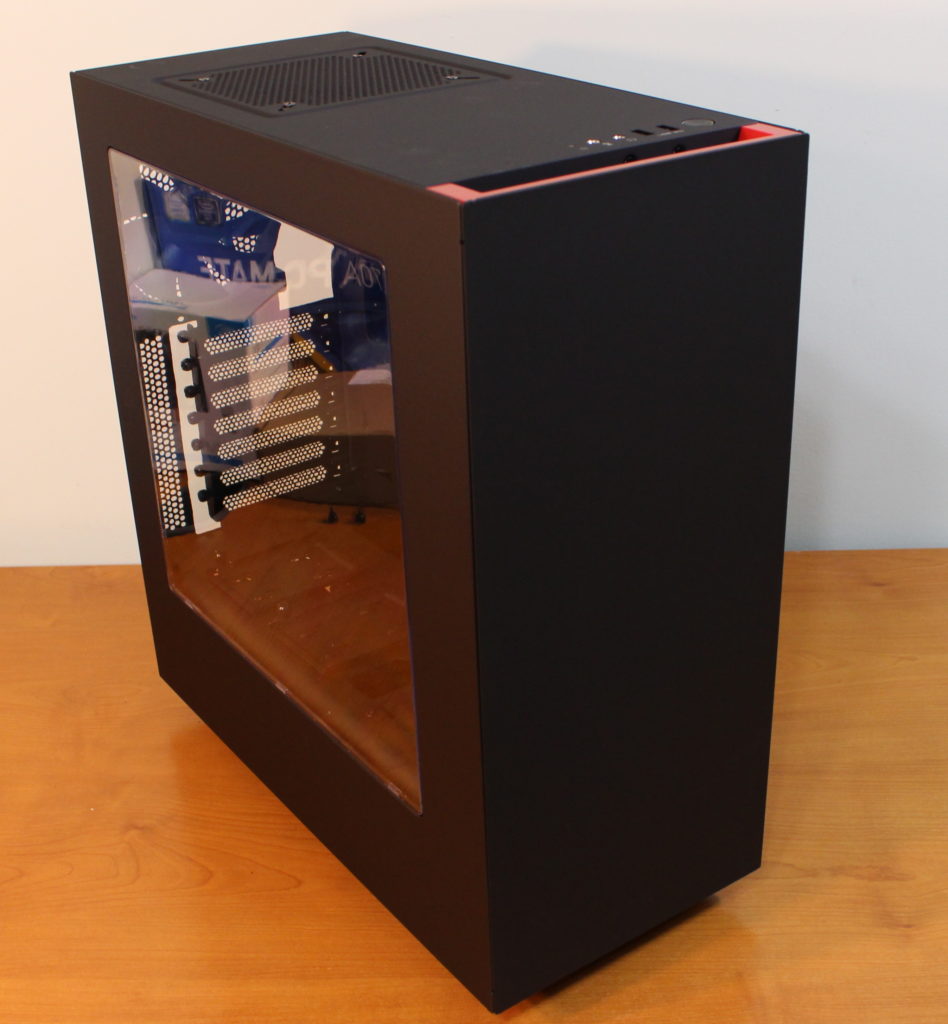
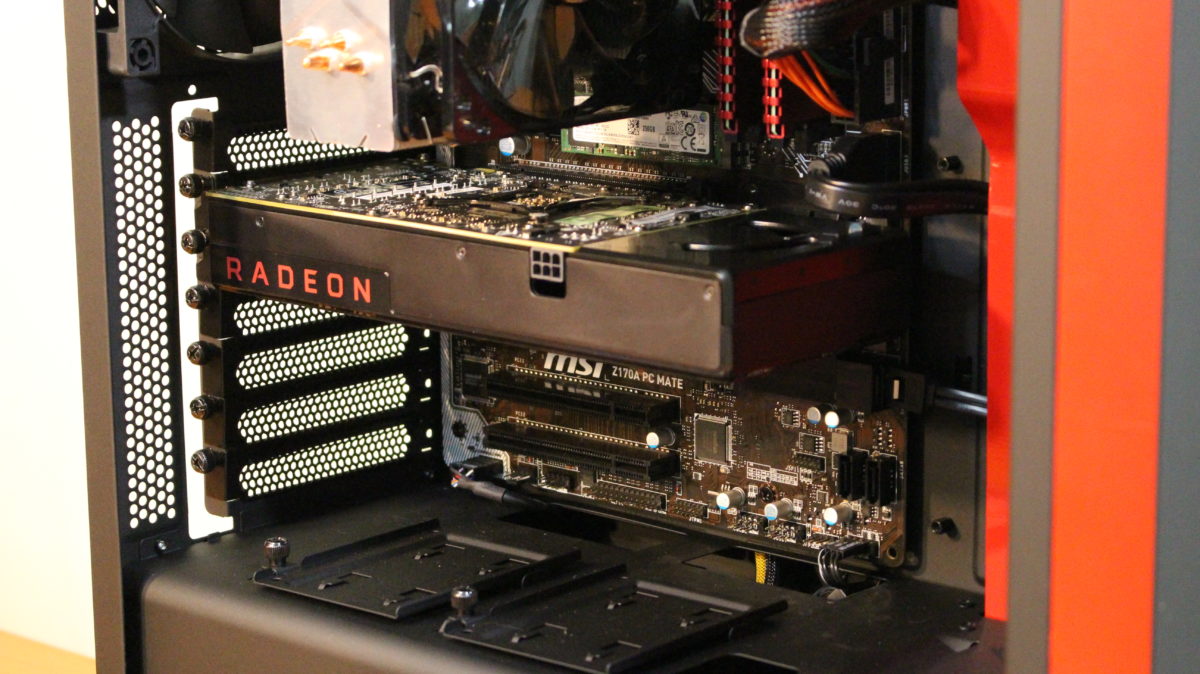
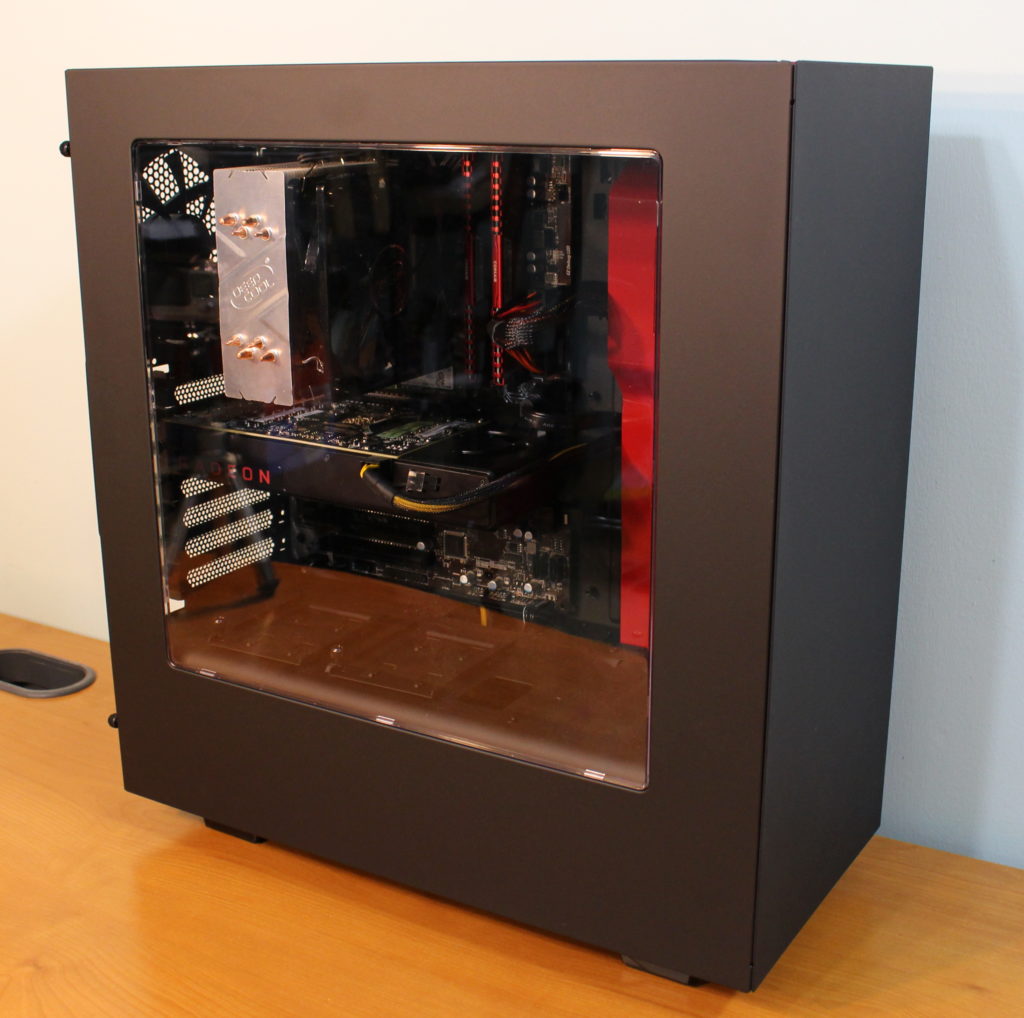
I presented him with several different choices for cases. He decided on the [easyazon_link identifier=”B00T4BWUUY” locale=”US” nw=”y” nf=”y” tag=”computersys05-20″]NZXT S340 Mid Tower Case CA-S340MB-GR Matte Black/Red[/easyazon_link]. It a very nice steel case with a side window to show off your build for the for a sub $100 price.
It comes in four different colors Matte Black, Black/Red, Black/Blue and white. This case plenty of space for additional cooling fans and water cooling radiators if you want to add them later on. It hides the power supply and hard drives in the bottom of the case for a very clean look. There are many spots for cable management and hiding them out of sight from the side window. It has 2 USB 3.0, mic and headphone jack on the top front of the case next to the power button. There is two front 120/140 mm fan mounting points in the front of the case. It has a removable air/dust filter for the front two fans and one filter on the bottom for the power supply fan. One 120 mm exhaust fan on the back and one 120/140 mm on top. Two 120 mm fans are included. I mounted one in the back as exhaust and the other in the front as an intake. I ordered one extra 120 mm fan to mount in the front to keep positive pressure in the case, to cool the components and help on keeping dust out of the case.
The cons to this case are there is not a 5.25 bay for a DVD/Blu-ray drive and there are only 3 3.5 in and 2 2.5 in drive bays. One other thing I noticed is the flat black finish of the paint on the outside show marks easily to.
MOTHERBOARD
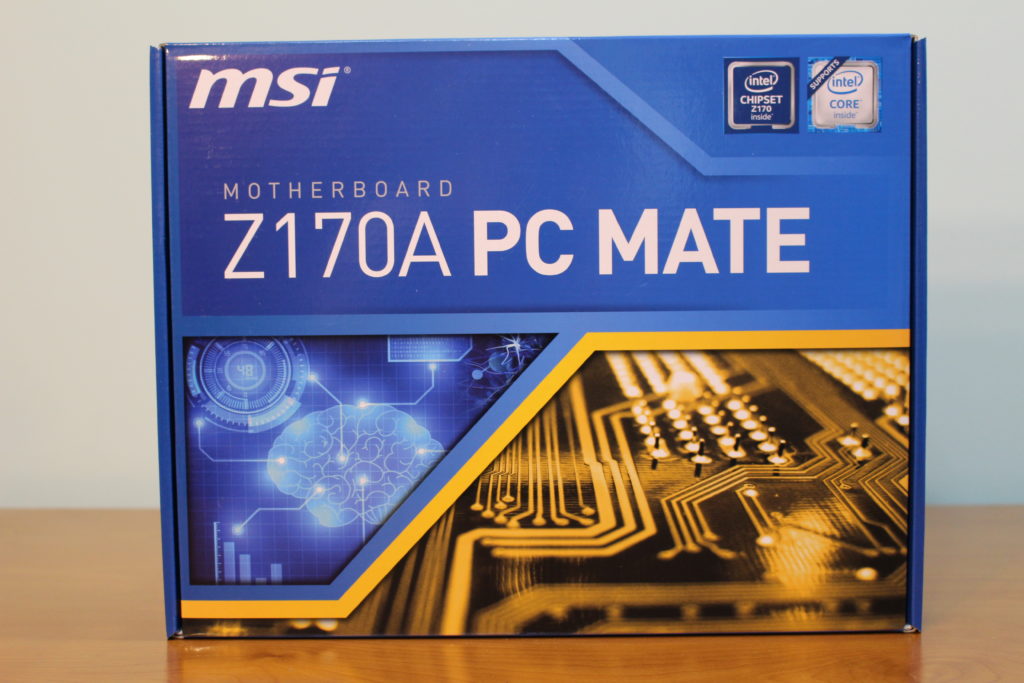
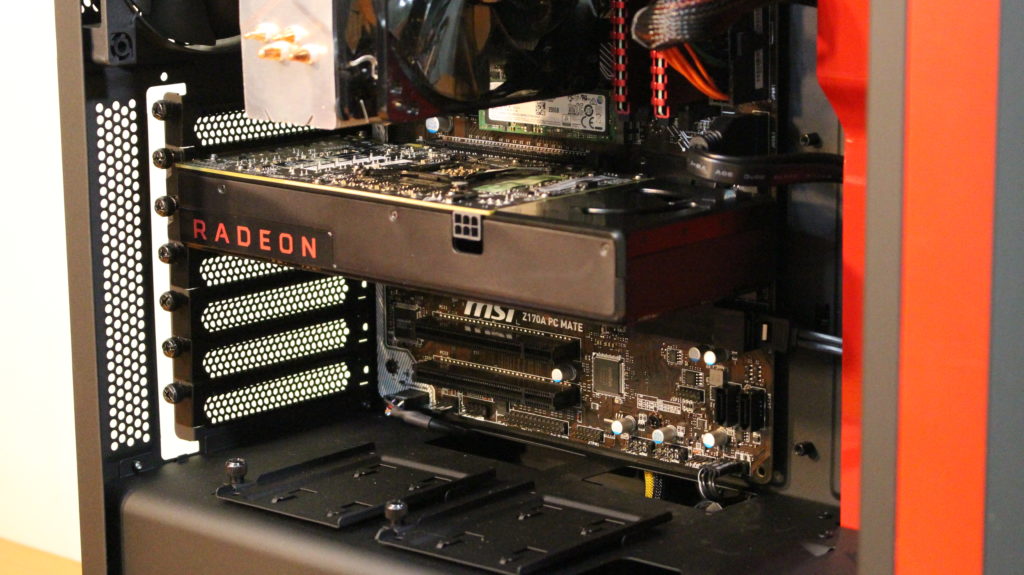
For the Motherboard I picked the [easyazon_link identifier=”B0131GA4VE” locale=”US” nw=”y” nf=”y” tag=”computersys05-20″]MSI Pro Solution Intel Z170A LGA 1151 DDR4 USB 3.1 ATX[/easyazon_link]. This is a well-rounded and decent priced motherboard with the Z170 chip set to enable overclocking the Intel 6600K that will go in this build. It has four RAM slots and supports up to 64GB DDR4 clocked between 2133-3200 MHz. The board has m.2 for a SSD to be mounted on the board. For expansion slots it has two PCI-E 3.0 16x, two PCI-E 3.0 1x and two PCI slots. You can use the second PCI-E 16x slot if you decide to upgrade down the road to with a second graphics card or you can just use a single card in it whichever you prefer. There are six SATA3 ports and supports RAID 0, 1, 5, 10. Integrated gigabit Ethernet. The BIOS on this MSI board was easy to navigate and setup. I had no problem applying a slight over clock to the CPU.
CPU
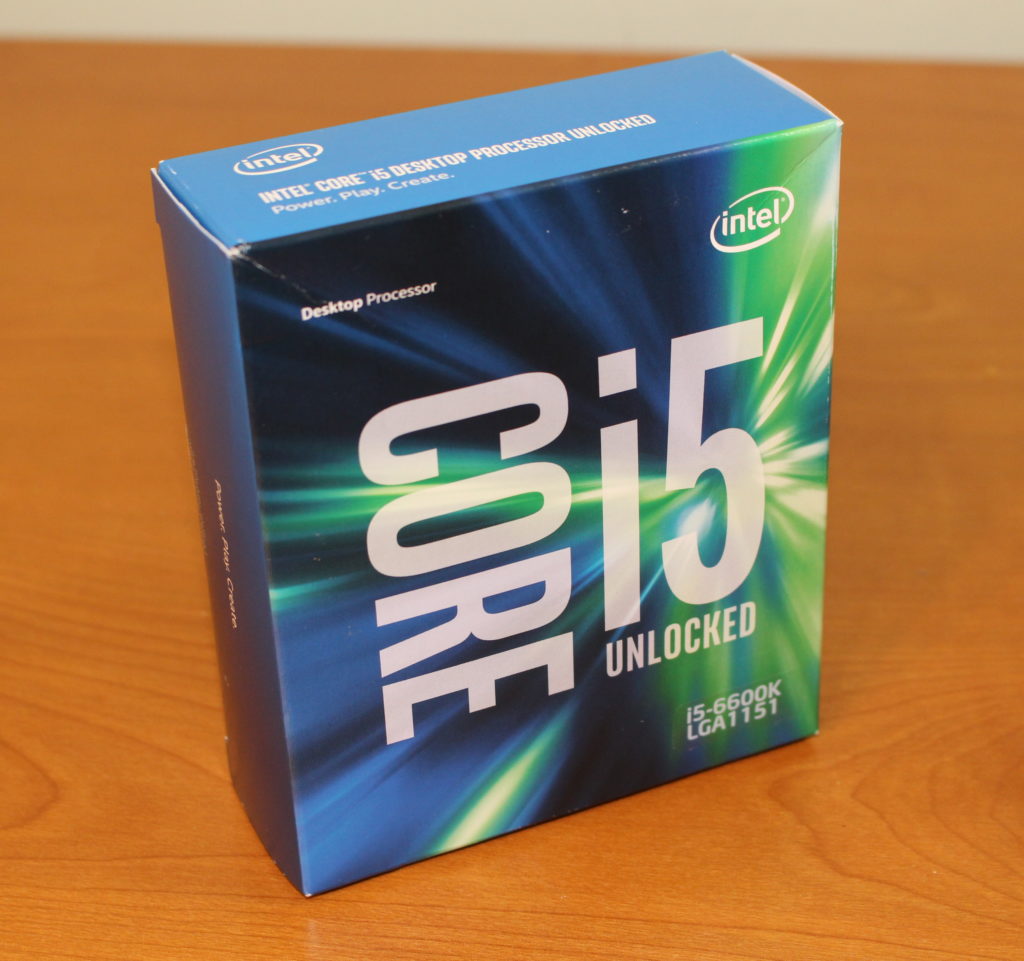
I advised him to go with the [easyazon_link identifier=”B0136JONRM” locale=”US” nw=”y” nf=”y” tag=”computersys05-20″]Intel Core i5 6600[/easyazon_link] non-k since he really doesn’t know how to overclocking but he decided to go with the [easyazon_link identifier=”B012M8M7TY” locale=”US” nw=”y” nf=”y” tag=”computersys05-20″]Intel Core i5 6600K[/easyazon_link]. It runs at 3.5 GHz with a 3.90 GHz turbo clock. It’s a Quad Core Skylake Desktop Processor, Socket LGA 1151, 6MB Cache. I only overclocked it to 4.0 GHz since this system is air cooled. I wanted to be conservative with it since he doesn’t know anything about overclocking. I told him if he decides to water cool it later on I will take the clock speed up further for him. This CPU is fast at stock speeds but does respond very good once you increase the clock multiplier a little bit. So far I see no cons to the Intel 6600K, it over clocks well and temperatures remain cool on the CPU.
CPU HEATSINK COOLER
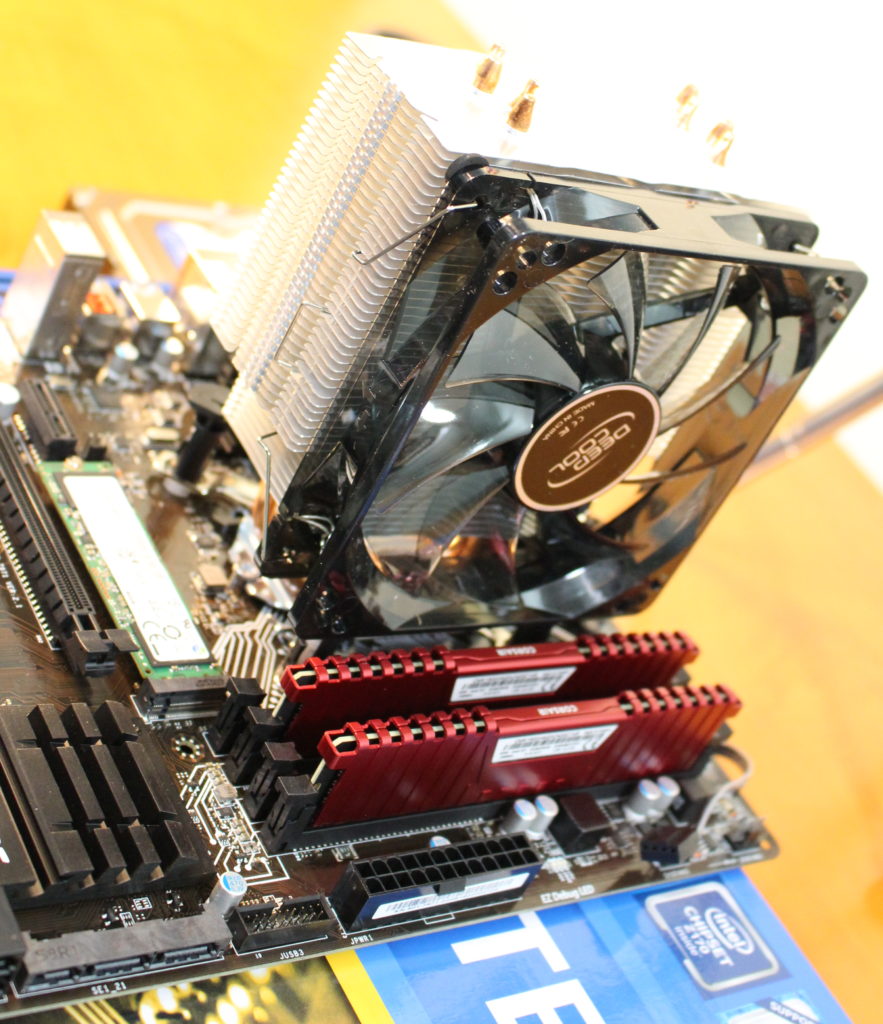
We went with a [easyazon_link identifier=”B00JQ2YDCY” locale=”US” nw=”y” nf=”y” tag=”computersys05-20″]DEEPCOOL GAMMAXX 400 CPU Cooler Heatsink w/ 120mm PWM Fan w/ Blue LED[/easyazon_link] to take care of the CPU cooling needs. I did not pick this one my friend did. I would have gone with a [easyazon_link identifier=”B005O65JXI” locale=”US” nw=”y” nf=”y” tag=”computersys05-20″]Cooler Master Hyper 212 EVO[/easyazon_link]. Overall the CPU heat sink cooler did a fine job of keeping the Intel 6600k cool even with the slight CPU overclock. It has 4 heat pipes and 120mm fan with blue led on it.
RAM
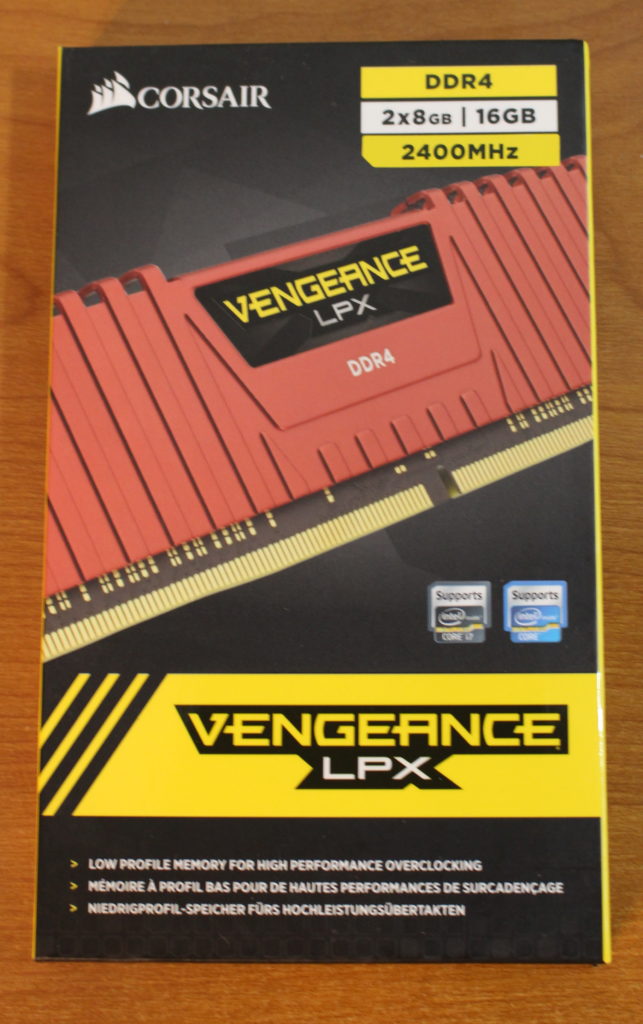
I went with [easyazon_link identifier=”B018EGTEK8″ locale=”US” nw=”y” nf=”y” tag=”computersys05-20″]Corsair Vengeance LPX 16GB DDR4 DRAM 2400MHz C16 Memory Kit[/easyazon_link]. This should be enough RAM to keep it running well for the foreseeable future and DDR4 is the latest standard to be released. Most computer gamers will not need any more than 16 GB at this time. Most games right now recommend 8GB but there are a few that recommend 16 GB. There will be two extra slots to upgrade later on if needed. You may want more if you do other intensive things with your computer like 3D rendering.
SSD HARD DRIVE
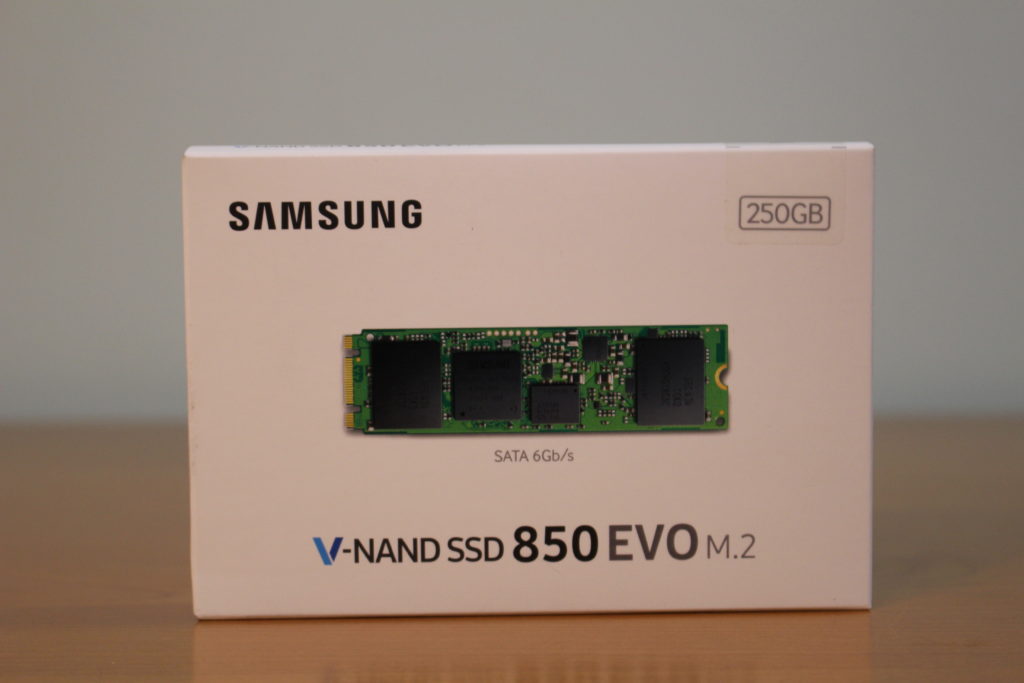
SSD is a must if you want a fast boot and fast loading into games. I went with the [easyazon_link identifier=”B00TGIVZTW” locale=”US” nw=”y” nf=”y” tag=”computersys05-20″]Samsung 850 EVO – 250GB – M.2 Internal SSD[/easyazon_link]. The nice part about M.2 drives is it’s on your motherboard with no wires or locating an empty drive bay to mount a 2.5 SSD drive. It’s a fast SSD and is decently priced. I wouldn’t recommend going any smaller than this. Even with 250GB can run out of space very quickly once you install windows, your applications and start installing your favorite game titles. Make sure you store the applications and games that you want to load fast on the SSD. Use another regular hard drive for everything else like your media (pictures, music, videos and other documents).
HARD DRIVE
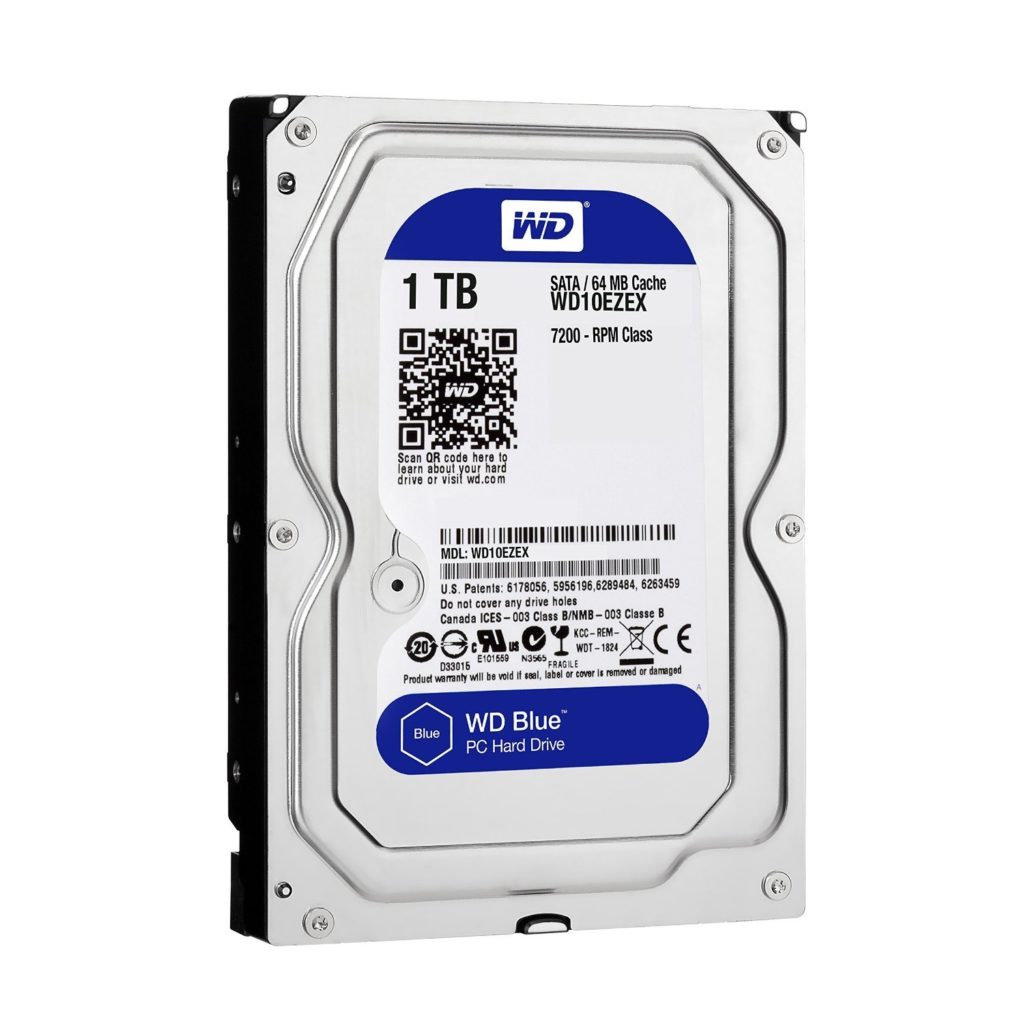
I went with a [easyazon_link identifier=”B0088PUEPK” locale=”US” nw=”y” nf=”y” tag=”computersys05-20″]WD 1TB blue 7200 rpm hard drive[/easyazon_link]. It can be used as extra storage if you run out of space on the SSD. Use this for storage of all your other media files like movies, music and pictures. Of course if 1TB isn’t enough you can go with a bigger drive like 2tb, 3tb and larger. If you’re looking for even better storage choices check out the FreeNAS build.
POWER SUPPLY

The [easyazon_link identifier=”B0092ML0OC” locale=”US” nw=”y” nf=”y” tag=”computersys05-20″]Corsair CX600[/easyazon_link] is a quality power supply and with 600 watts on hand it will be able to power this gaming rig with no problems. It is 80+ Bronze certified. Has an ultra quiet 120mm fan that varies fan speed according to temperature in the power supply. There are 2 PCI-E connectors for graphics cards and 6 SATA connecters for hard drives. You might consider a bigger power supply if you plan on adding a second graphics card to your gaming build as two cards will most likely be too much for the CX600.
GRAPHICS CARD
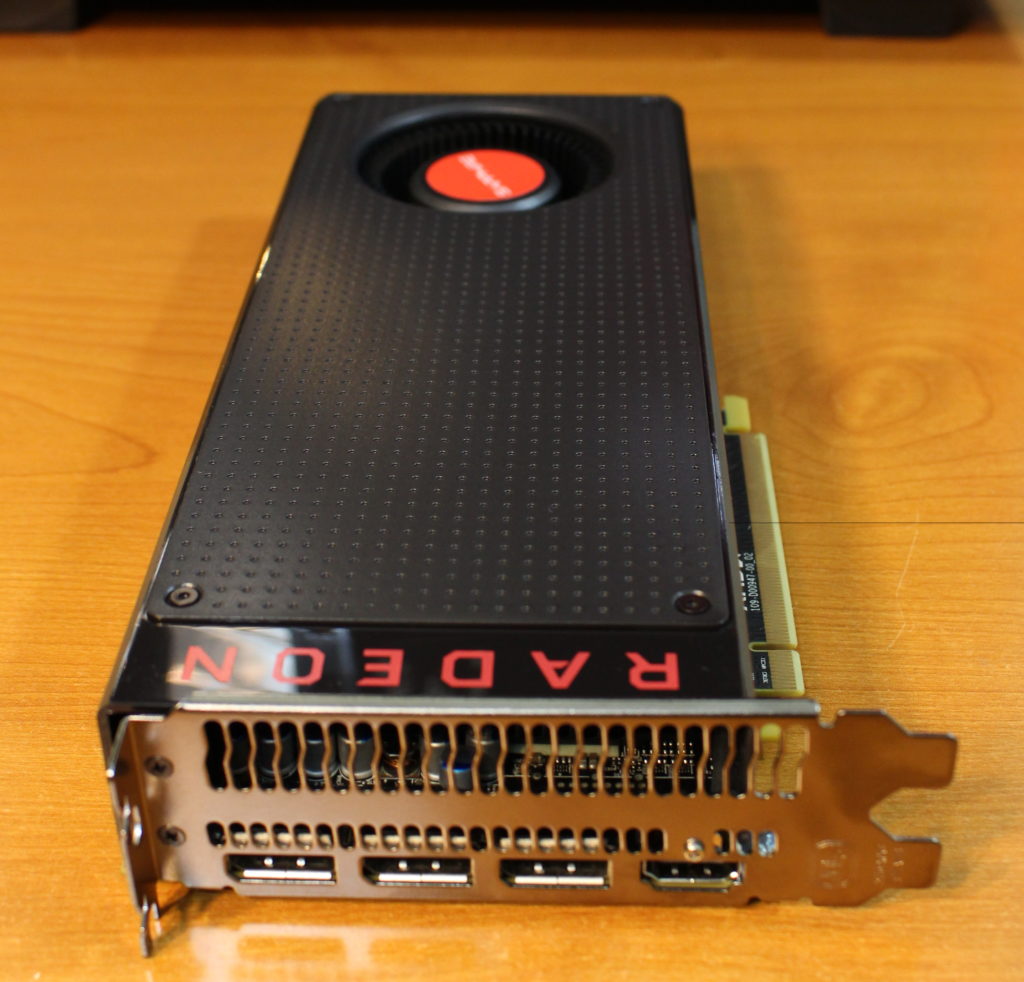
The AMD RX 480 8GB graphics cards are hands down one of the best for the price with all the modern features of the new generation of GPU’s. No it’s not an NVidia GTX 1080 but is still a good graphics card. As of writing this I could not find the reference card show above. This [easyazon_link identifier=”B01J1M4CZG” locale=”US” nw=”y” nf=”y” tag=”computersys05-20″]AMD Sapphire Radeon NITRO+ RX 480 8GB[/easyazon_link] graphics card will perform the same and run a little bit cooler and quieter without a reference design cooler. It is VR capable. If you decide to add a second [easyazon_link identifier=”B01J1M4CZG” locale=”US” nw=”y” nf=”y” tag=”computersys05-20″]RX 480[/easyazon_link] it will outperform the [easyazon_link identifier=”B01K5F8MJK” locale=”US” nw=”y” nf=”y” tag=”computersys05-20″]NVidia GTX 1080[/easyazon_link] and save you a few hundred dollars.
BUILD PARTS SUMMARY AND PRICING

Here is a complete listing of all the computer hardware parts I used for this $1000 gaming computer build.
| Type | Component | Price |
|---|---|---|
| Case | [easyazon_link identifier="B00T4BWUUY" locale="US" nw="y" nf="y" tag="computersys05-20"]NZXT S340 Mid Tower[/easyazon_link] | $77.71 |
| Motherboard | [easyazon_link identifier="B0131GA4VE" locale="US" nw="y" nf="y" tag="computersys05-20"]MSI Pro Solution Intel Z170A[/easyazon_link] | $88.00 |
| CPU | [easyazon_link identifier="B012M8M7TY" locale="US" nw="y" nf="y" tag="computersys05-20"]Intel Core i5 6600K[/easyazon_link] | $237.49 |
| Heatsink CPU Coolers | [easyazon_link identifier="B00JQ2YDCY" locale="US" nw="y" nf="y" tag="computersys05-20"]DEEPCOOL GAMMAXX 400[/easyazon_link] | $29.94 |
| RAM | [easyazon_link identifier="B018EGTEK8" locale="US" nw="y" nf="y" tag="computersys05-20"]Corsair Vengeance LPX 16GB DDR4 2400MHz[/easyazon_link] | $74.99 |
| Graphics Card | [easyazon_link identifier="B01J1M4CZG" locale="US" nw="y" nf="y" tag="computersys05-20"]AMD Sapphire Radeon NITRO+ RX 480 8GB[/easyazon_link] | $269.99 |
| SSD Hard Drive | [easyazon_link identifier="B00TGIVZTW" locale="US" nw="y" nf="y" tag="computersys05-20"]Samsung 850 EVO - 250GB[/easyazon_link] | $95.32 |
| Hard Drive | [easyazon_link identifier="B0088PUEPK" locale="US" nw="y" nf="y" tag="computersys05-20"]WD 1TB blue 7200 rpm[/easyazon_link] | $49.99 |
| Power Supply | [easyazon_link identifier="B0092ML0OC" locale="US" nw="y" nf="y" tag="computersys05-20"]Corsair CX600[/easyazon_link] | $56.99 |
| Computer | $1000 Budget Gaming PC Build 2016 | $980.42 |
The total cost of this gaming computer system build is $980.42 just under the $1000 budget. This system will perform very well with the combination of Intel 6600K and the AMD RX480. I didn’t have enough time to do real world gaming benchmarks as I had to get this computer to my friend on short notice. If you are looking cheaper and a smaller gaming computer check out this $500 budget gaming computer system build.

Recommended/Optional Components and Accessories
Here are some recommended and optional components. I don’t include the OS, Monitor, keyboard mouse or speakers in my builds on this site usually. On my personnel computers I reuse these things when I build a new computer.
OS
Recommended Operating System [easyazon_link identifier=”B01LZKNPUJ” locale=”US” nw=”y” nf=”y” tag=”computersys05-20″]Windows 10 64 bit[/easyazon_link]. I did not included in the build because you may want to go with something else like Windows 7, 8, Ubuntu or some other Linux distro.
Virtual Reality (VR) Headset
You will be able to use the [easyazon_link identifier=”B00VF5NT4I” locale=”US” nw=”y” nf=”y” tag=”computersys05-20″]HTC VIVE[/easyazon_link] for VR on this gaming computer but if you want the best performance out of this VR headset you may want to consider upgrading the graphics card to a NVIDIA GeForce [easyazon_link identifier=”B01I60OGUK” locale=”US” nw=”y” nf=”y” tag=”computersys05-20″]GTX 1070[/easyazon_link] or [easyazon_link identifier=”B01K5F8MJK” locale=”US” nw=”y” nf=”y” tag=”computersys05-20″]NVidia GTX 1080[/easyazon_link].
Monitors
Here are a couple of choices for monitors. The [easyazon_link identifier=”B00KJGY3TO” locale=”US” nw=”y” nf=”y” tag=”computersys05-20″]ASUS PB287Q 28″ 4K/UHD 3840×2160 1ms[/easyazon_link] is a good 4k Gaming monitor. If that is too pricy here is a nice 1080p [easyazon_link identifier=”B00B2HH7G0″ locale=”US” nw=”y” nf=”y” tag=”computersys05-20″]ASUS VG248QE 24″ Full HD 1920×1080 144Hz 1ms[/easyazon_link].